Making Your Power BI Teams More Analytic - The Foundation
Continuing this series, in order to make our teams more analytic, we need tools to facilitate data collection. Let’s discuss the prerequisites for each of your Power BI teammates:
Visual Studio Code
In my opinion, this is the best integrated development tool - and it’s free to install! Your team will use Visual Studio Code to check in and sync changes with Azure DevOps.Azure DevOps
Azure DevOps is essential for storing Power BI content and leveraging Azure Pipelines to automate data collection and testing. It’s free for up to four users, and I’ve found that many organizations already have it available in their environments. I don’t distinguish between Azure DevOps (the service) and Azure DevOps Server, as the templates I’ll provide will work with both.Git
Git is the linchpin that makes all of this work. For some, learning Git can feel daunting, especially for those without a software development background. I often spend time training teams to use Git effectively. Fortunately, there are excellent resources to help you get started. For example, Kevin Stewart’s video on YouTube and the Visual Studio Code channel both provide great introductions. And the best part? Git is free to install.Power BI Desktop (at least the July 2024 version)
You might be wondering why this is on the list - after all, a Power BI team should already be using Power BI Desktop, right? However, in my experience, many teams don’t upgrade this software frequently. Some of the newer features, such as the Power BI project format, were introduced only in the past 18 months, making an update essential.
The Setup
With these prerequisites in place, let's discuss the initial setup for Azure DevOps.
Azure DevOps Setup
Azure DevOps provides a convenient way to copy a repository for another GitHub page, and I've got a template to help you get started. You can copy the template by performing the following:
Setup an Azure DevOps Project by following these directions.
Navigate to the Repos and select the Import option.
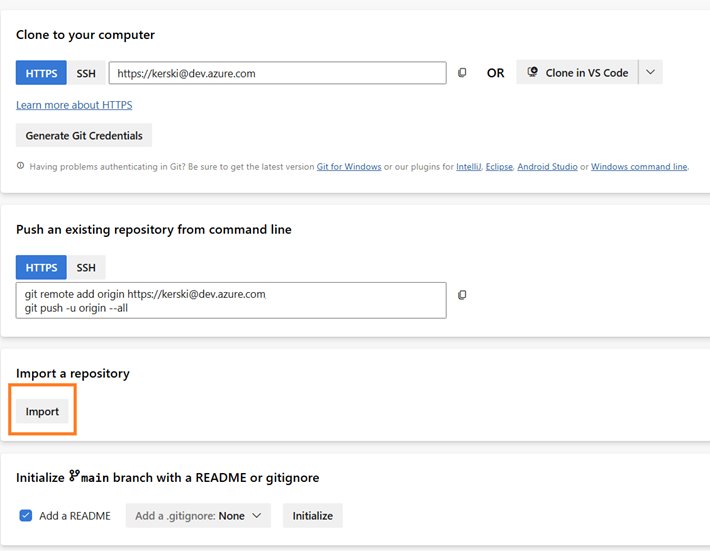 Figure 1 – Import Repository
The “Import a Git repository” window should appear and enter “https://github.com/kerski/pbi-teams-more-analytic” into the Clone URL field and select the import option.
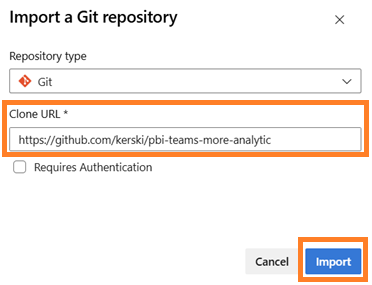 Figure 2 – Import a Git Repository
Once the Import button is selected, the import process will begin and could take a few minutes.
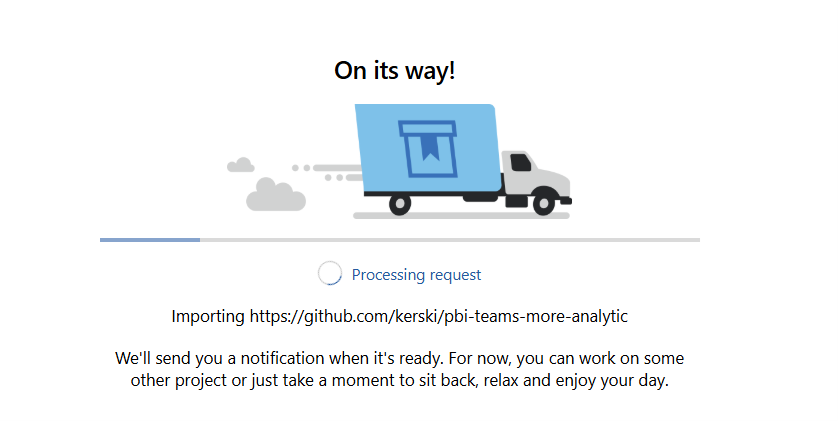 Figure 3 – Example of importing Git repository from GitHub into Azure DevOps.
Once completed you’ll see the repository imported.
Clone Repository
With the repository established in Azure DevOps, we need to work with it on our local machines. In Git jargon, this process is called cloning the repository. Cloning creates a copy of the repository on your local machine and links it to Azure DevOps, allowing you to sync the changes you make to your Power BI files. Each team member will need to perform this step to collaborate on the same repository in Azure DevOps.
Follow these steps:
From the repository page, we’ll need to select the Clone option.
 Figure 4 – Example to Clone repository
Select the “Clone in VS Code” option.
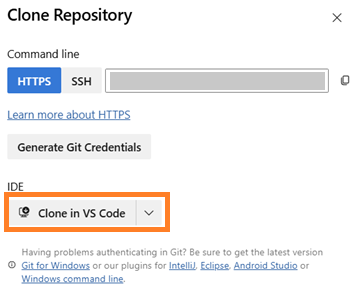 Figure 5 – Example of Clone in VS Code button.
A browser window often appears that will ask permission to open Visual Studio Code. Select the “Open” button.
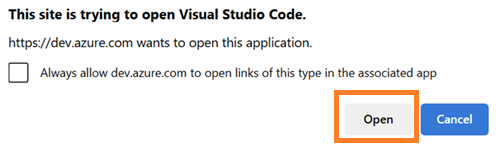 Figure 6 – Browser may prompt to ask permission to open in Visual Studio Code.
You will be asked to select a folder to import. Pick the appropriate location on your local machine and then select the option “Select a Repository Destination.”
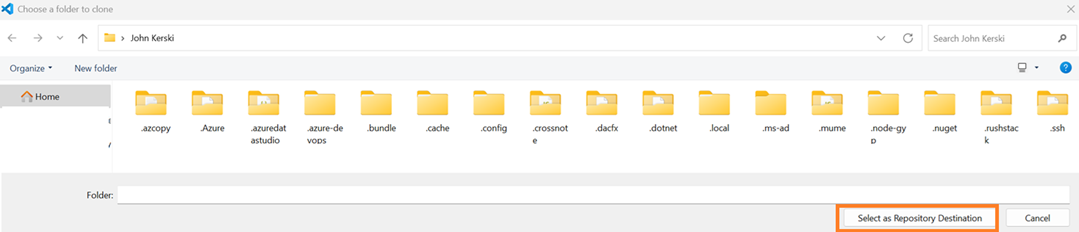 Figure 7 – Example of selecting the repository destination.
Once imported you may be presented with the following pop-up. Select the “Open” option.
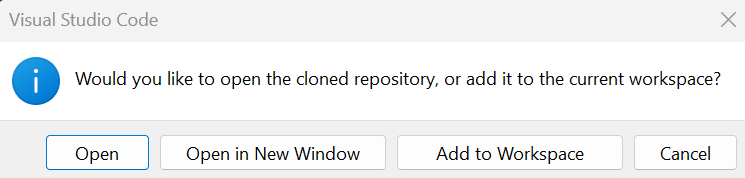 Figure 8 – Window to open clone repository.
Now that we’ve cloned the repository locally in Visual Studio Code, we need to inform Git who is doing the work. This ensures that when changes are pushed back to the Azure DevOps repository, we can track who made them. To do this, go to Visual Studio Code’s top menu and select Terminal → New Terminal.
 Figure 9 – Opening the Terminal Window.
In the command line you’ll need to enter the following commands:
git config --global user.email "{INSERT EMAIL}"
git config --global user.name "{INSERT NAME}"
Figure 10 – Example of adding git information.
Saving Into PBIP Format
If this is your first time working with the Power BI project format, you’ll need to enable it. This format allows changes to be saved in a text-based structure, which Git is excellent at tracking. At the time of this writing, the PBIP format is still in preview. I’ll be using the format without TMDL or PBIR. The reason is that the original PBIP format uses model.bim for data and report.json for the report. These formats have been around for several years and are considered stable. While TMDL and PBIR will eventually become the standard, they won’t dramatically change the process for saving and syncing your work. With that disclaimer out of the way, let me walk you through enabling the PBIP format:
Enable the PBIP format in Power BI Desktop by following these instructions. Be sure the only checked box is the first option.
 Figure 11 - Enable PBIP format.
You will be prompted to restart Power BI Desktop once you select the “OK” button in the Preview features.
After you restart Power BI Desktop, you can open a PBIP file. As part of the template, I saved a sample Power BI report in the PBIP format to use in this series. You can do so by returning to Visual Studio Code from the prior steps. Right click on the File Explorer where SampleModel.pbip is located.
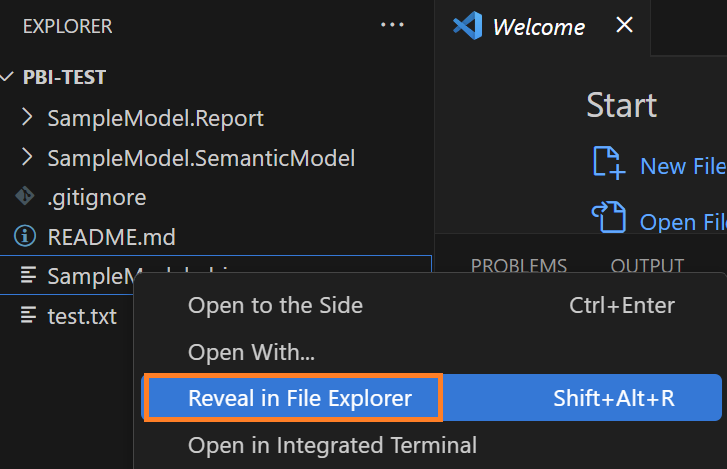 Figure 12 – Right-click on SampleModel.pbip and select Reveal in File Explorer.
This will open Windows File Explorer where you cloned your repository. You can now double-click on SampleModel.pbip to open the file in Power BI Desktop.
Since the PBIP format does not save data to the repository (a great security feature), you’ll need to select the refresh option. This will pull data from GitHub and should not require any credentials.
 Figure 13 – Selecting the bottom “Refresh now” option.
After the refresh is complete, you should see a report that looks like Figure 14.
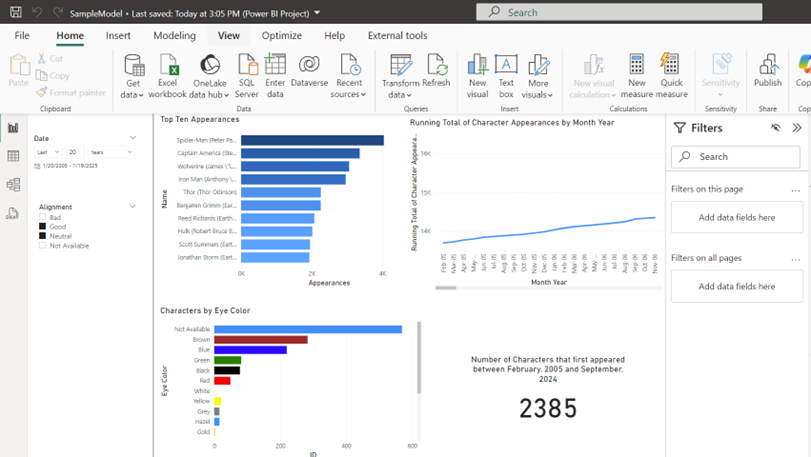 Figure 14 - Example of SampleModel in PBIP format
From here we’ll keep the SampleModel open to demonstrate how to save changes and synchronize those changes to Azure DevOps.
Saving the Changes and Synchronization
These next set of instructions should be a consistent pattern you apply every day the team starts work.
Close Power BI Desktop. No instances should be up as it may prevent any changes your teammates made from syncing.
Open Visual Studio Code. If you haven't worked on other projects, this repository's folder should come up by default. If not, you will need to go to File🡪Open Folder and select the folder you cloned the repository locally.
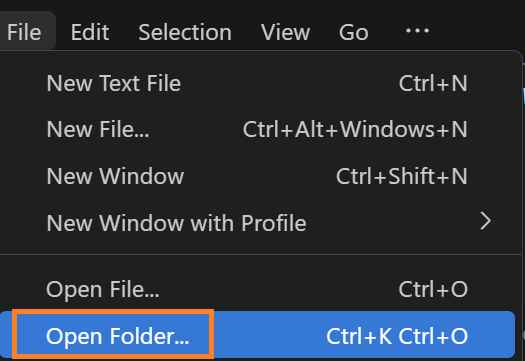 Figure 15 – Example of using File 🡪 Open Folder feature in Visual Studio Code.
Verify the branch you are on by looking at the lower left-hand corner of the Visual Studio code. You should be at the development branch. If you see that it does not say development, please open the terminal.
 Figure 16 – Example of opening the terminal again.
Then enter the command “git checkout development”. This will switch the branch to development.
 Figure 17 – Example of git check to switch to development
 Figure 18 – Example when Visual Studio Code is on the development branch
Now, you will then click the synchronization icon next to the branch name. This will check with Azure DevOps if any changes have been made.
 Figure 19 – Example of synchronization button
With SampleModel.pbip opened, make a few updates to the report. For example, I will update a DAX measure and update the default choices for one of the slicers. After you have completed the changes, save your changes.
Committing and Syncing Changes
Once you complete your updates or reach a point where you’re ready to save your work and share it with the team, you’ll need to perform two steps. In Git jargon, these are commit and sync. When I first started with Git, I was told: “You commit locally and sync globally.” In other words, you commit your changes to the local version of your repository, which acts as a snapshot of your work. Then, you sync that snapshot to the repository in Azure DevOps so others can see the changes you’ve made. Let’s walk through these steps:
Let’s assume I updated a DAX measure and slicer in the SampleModel file and saved those changes in Power BI Desktop. If you return to Visual Studio Code, you will see a number next to the Source Control button. Click on that button.
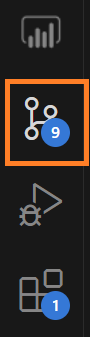 Figure 20 – Example of source control button with changes.
You should see the Source Control window. Please enter a short description, less than 50 characters, in the Message field that explains what changes you made. Then you can select the “Commit” button. Note: If you don’t enter a message and enter commit, I often see Visual Studio Code “hang” and the changes won’t commit. If you forget to enter a message (believe me, I’ve done it), you will need to close Visual Studio Code and open it again, then put in the message.
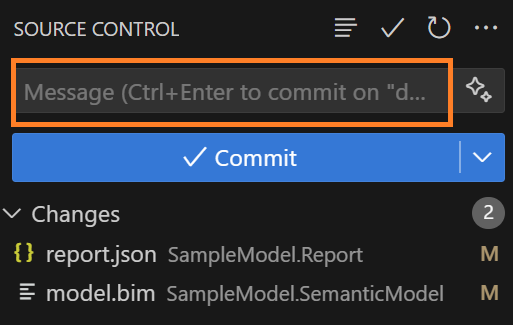 Figure 21 – Example of Committing changes, don’t forget to enter a message.
Once the Commit button is selected, the Commit button switches to a “Sync” button. Select the “Sync Changes” option.
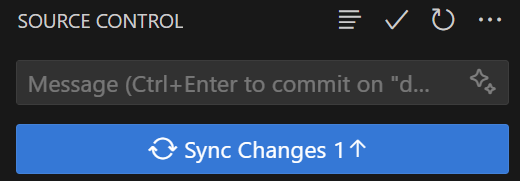 Figure 22 – Example of Sync Changes Button
If all goes well, you can navigate to the repository in Azure DevOps and see the changes you made locally is synchronized to the development branch. Note you will need to make sure you have selected the development branch to view in the browser.
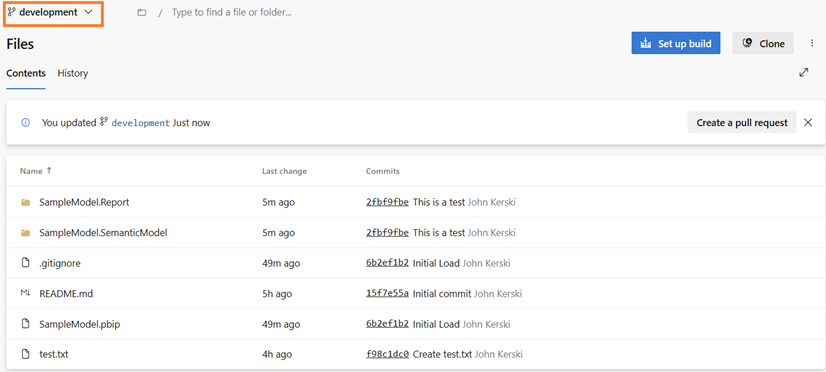 Figure 23 - Example of repository synced.
End of Instructions
Does it seem like a lot? Once you and your team develop the habit Saving the Changes and Synchronization, it becomes much easier to follow. Just remember these steps:
- Click the Sync button.
- Open the PBIP file and make your changes.
- Commit those changes locally.
- Sync those changes so the rest of your team can receive them.
Microsoft could also make our lives easier by integrating Git directly into Power BI Desktop. If you like that idea, consider voting for it here.
You might be wondering: What about publishing to a workspace? I’ll get to that in a later article as there are several things to consider with your team and the data you work with. The next article will be on tracking changes to your Power BI Project files in Azure DevOps.
Let me know what you think on LinkedIn.